Whip Up No-Bake Protein Energy Balls for Easy Snack Prep
Learn how to make quick, no-bake protein energy balls—perfect for a healthy snack or meal prep. Packed with protein and easy to customize!
SNACK
Mae Ellison
3/14/20254 min read
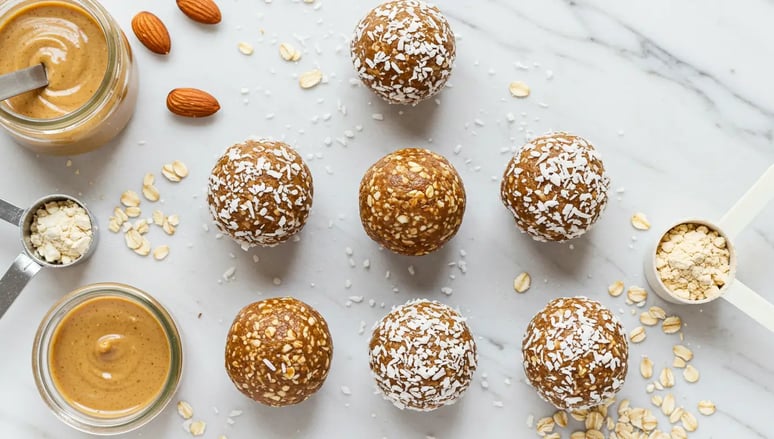

No-Bake Protein Energy Balls
Are you tired of spending hours in the kitchen prepping snack only to feel sluggish by mid-morning/afetrnoon? What if I told you there’s a way to make delicious, high-protein snacks that are ready in minutes and keep you energized all day long?
Welcome to the world of no-bake protein energy balls! These little bites of goodness are perfect for meal prep enthusiasts, busy professionals, parents on the go, or anyone who craves a quick yet nutritious snack. Let’s dive into how you can whip up these tasty treats in no time.
What Makes This Recipe Special?
No-bake protein energy balls are a game-changer because they’re high in protein, super easy to make, and require zero baking skills. Whether you’re looking for an easy meal prep solution or a grab-and-go snack option, these energy balls have got your back.
Time Requirement: Just 10–15 minutes of active prep time.
Difficulty Level: Beginner-friendly—no fancy equipment needed (just a mixing bowl and some hands!).
Customization: You can tailor them to your taste buds while still packing in the nutrients.
Essential Ingredients: Why They Matter
Here’s what you’ll need to create these magical energy balls:
Oats: 1 cup rolled oats or quick oats provide fiber and give the balls structure. They also help keep you full longer.
Substitution Tip: Use gluten-free oats if needed.Protein Powder: 2 scoops (about 50 grams) protein powder of your choice (whey, plant-based, or collagen) for boosting protein content.
Variation Idea: Swap protein powder with nut butter for a protein-rich alternative.Nut Butter: ½ cup almond butter, peanut butter, or cashew butter adds healthy fats and creaminess. Opt for unsweetened versions to control sugar intake.
Substitution Tip: Sunflower seed butter works great for nut-free diets.Sweetener: ¼ cup honey or maple syrup, or 3–4 dates (pitted) to add natural sweetness without refined sugars. Dates also act as a binder, holding everything together.
Add-ins:
1 tablespoon chia seeds or flaxseeds
A pinch of cinnamon (optional)
2 tablespoons dark chocolate chips
1 tablespoon shredded coconut (toasted or plain)
Each ingredient plays a role in making these energy balls not just delicious but also nutrient-dense!
Step-by-Step Instructions
Ready to get started? Follow these simple steps:
Step 1: Gather Your Ingredients
Ensure that all your ingredients are pre-measured and prepared before you begin. This will save time and ensure smooth assembly.
Step 2: Mix Dry Ingredients
In a large bowl, combine:
1 cup rolled oats
2 scoops (about 50 grams) vanilla protein powder
1 tablespoon chia seeds or flaxseeds
A pinch of cinnamon (optional)
Mix well to evenly distribute the dry ingredients.
Step 3: Add Wet Ingredients
To the same bowl, add:
½ cup almond butter (or your favorite type of nut butter)
¼ cup honey or maple syrup
1 teaspoon vanilla extract
Stir until the mixture forms a sticky dough. If it feels too dry, add a bit more nut butter or sweetener.
Step 4: Fold in Extras
For added texture and flavor, mix in:
2 tablespoons dark chocolate chips
1 tablespoon shredded coconut (toasted or plain)
These extras take the energy balls from good to amazing!
Step 5: Form the Balls
Using your hands, roll the dough into bite-sized balls (about 1-inch diameter). You should end up with around 12–15 balls, depending on size.
Assembly Tips
Consistency Check: If the dough isn’t sticking together, pop it in the fridge for 10 minutes to firm up.
Presentation Ideas: Roll the finished balls in toppings like cocoa powder, crushed nuts, or extra shredded coconut for a decorative touch.
Portion Control: Keep the balls small—they’re meant to be snacks, not meals!
Storage and Make-Ahead Tips
One of the best things about no-bake protein energy balls is their versatility when it comes to storage:
Refrigerator Storage: Store the balls in an airtight container in the fridge for up to 1 week. The cool temperature helps maintain freshness.
Freezer Option: For longer storage, freeze the balls in a single layer on a baking sheet before transferring them to a freezer-safe bag. They’ll last up to 3 months.
Thawing: Simply let frozen balls sit at room temperature for 10–15 minutes before enjoying.
By preparing a batch ahead of time, you’ll always have a healthy snack or mini-breakfast ready to grab!
Recipe Variations
Why stick to one recipe when you can experiment with endless variations? Here are some ideas:
Chocolate Lovers’ Delight: Add 2 tablespoons cocoa powder to the mix and top with melted dark chocolate drizzle.
Tropical Twist: Use 2 tablespoons coconut flakes and ¼ cup dried mango chunks for a tropical vibe.
PB&J Style: Stir in ¼ cup crushed raspberries or strawberries for a fruity kick.
Matcha Madness: Incorporate 1 teaspoon matcha powder for an antioxidant boost.
Feel free to mix and match based on what’s in your pantry!
Conclusion
No-bake protein energy balls are more than just a snack—they’re a lifestyle upgrade. With their high protein content, ease of preparation, and endless customization options, they’re perfect for anyone looking to simplify meal prep or enjoy a nutritious snack on the go. So why wait? Grab your ingredients, roll up your sleeves, and start experimenting today!
Remember, cooking doesn’t have to be complicated to be delicious. These energy balls prove that sometimes the simplest recipes are the most satisfying.
FAQs
Q: Are these energy balls suitable for vegans?
A: Absolutely! Just use plant-based protein powder and swap honey for maple syrup.
Q: How many calories are in each ball?
A: On average, each ball contains about 140–150 calories, depending on the ingredients used.
Q: Can I omit the protein powder?
A: Yes, but you may want to increase the amount of nut butter or add another binding agent like mashed banana.
Q: Do I need a food processor?
A: Not necessarily. While a food processor makes blending easier, you can achieve similar results using a strong blender or even a fork for softer ingredients.
Q: Are these energy balls kid-friendly?
A: Definitely! Kids love the sweetness and fun size of these snacks. Plus, they’re a great way to sneak in extra protein and nutrients.
Now that you know everything there is to know about no-bake protein energy balls, it’s time to get creative in the kitchen. Happy snacking!

