How to Make Quick & Easy No-Bake Greek Yogurt Cheesecake Jars
Learn how to make high-protein, No-Bake Greek Yogurt Cheesecake Jars—a quick, customizable dessert perfect for meal prep!
DESSERT
Mae Ellison
3/23/20254 min read
No-Bake Greek Yogurt Cheesecake Jars: Your New Go-To High-Protein Dessert
Have you ever craved a dessert that’s creamy, dreamy, and guilt-free? What if I told you it’s possible to satisfy your sweet tooth while still getting a hefty dose of protein? Say hello to No-Bake Greek Yogurt Cheesecake Jars — a high-protein, easy meal prep dessert that’s as delicious as it is nutritious. Perfect for those busy days when you need something quick but don’t want to skimp on flavor or health benefits, this recipe is here to save the day (and your taste buds). Let’s get started! Here’s why this recipe will become your favorite.
This no-bake wonder checks all the boxes:
Time-Saving: Ready in under 20 minutes with minimal effort.
Difficulty Level: Beginner-friendly; no baking skills required.
Health Benefits: Packed with protein from Greek yogurt and cream cheese, plus fiber from the crust.
Versatility: Customize it to suit your preferences or dietary needs.
Whether you're getting ready for the week or making a quick snack, these jars are sure to become your go-to prepared meal.
Essential Ingredients
Here’s what you’ll need for 1 serving (double the quantities for 2 servings):
For the Crust:
3 tablespoons graham cracker crumbs (or crushed cookies like digestive biscuits)
Why it matters: Provides a crunchy base and balances the creamy filling.
Substitutions: Use gluten-free cookies or almond flour for a low-carb option.
1 teaspoon melted butter
Why it’s important: Helps bind the crumbs, creating a strong crust.
For the Filling:
1/4 cup plain Greek yogurt (use full-fat for creaminess or low-fat for fewer calories)
Why it matters: Adds tangy flavor and boosts protein content.
2 tablespoons softened cream cheese
Why it matters: Creates a rich, velvety texture.
1 tablespoon honey or maple syrup
Why it matters: Sweetens the filling naturally.
Substitutions: Stevia or agave nectar work well for lower sugar options.
1/4 teaspoon vanilla extract
Why it matters: Enhances the overall flavor profile.
For the Topping:
2 tablespoons of fresh natural product (such as berries, cut bananas, or mango chunks)
Why it matters: Adds natural sweetness and color contrast.
1 teaspoon granola or chopped nuts (optional)
Why it matters: Offers extra crunch and texture variety.
Step-by-Step Instructions
Let’s get started! Follow these simple steps to create your own No-Bake Greek Yogurt Cheesecake Jars.
Step 1: Prepare the Crust
Mix 3 tablespoons of graham cracker crumbs with 1 teaspoon of melted butter in a small bowl until it resembles wet sand.
Divide the crust evenly between your jar(s). Press it down gently using the back of a spoon to form a firm base.
Tip: If making multiple servings, layering individual jars makes assembly easier later.
Step 2: Make the Cheesecake Filling
In another bowl, combine 1/4 cup of Greek yogurt, 2 tablespoons of softened cream cheese, 1 tablespoon of honey, and 1/4 teaspoon of vanilla extract.
Mix well. Add sweetener to taste.
Pro Tip: Microwave cream cheese for 10 seconds or let it sit at room temp for 15 minutes.
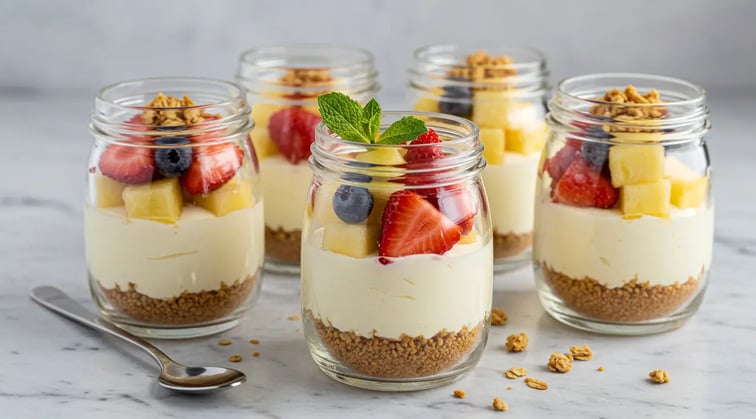
Step 3: Layer the Components
Spoon the cheesecake filling onto the crust in each jar, smoothing it evenly.
Top with 2 tablespoons of fresh fruit and sprinkle 1 teaspoon of granola or chopped nuts for added crunch.
Presentation Tip: Use clear glass jars to showcase the beautiful layers. Garnish with mint leaves or edible flowers for an Instagram-worthy touch.
Assembly Tips
Building these jars is half the fun! Here’s how to make them look as delicious as they taste:
Layering Order: Begin with the crust, followed by the filling, and top it off with the toppings.
Color Contrast: Choose vibrant fruits like strawberries, blueberries, or kiwi slices to brighten up the dish.
Portion Control: Use mini mason jars or ramekins for single-serving portions—perfect for meal prep!
Storage and Make-Ahead Tips
Love that these are meal prep friendly.
Storage: Store the assembled jars in the fridge for up to 3 days. Keep the crust and filling separate if preparing ahead to prevent sogginess.
Freezing: While not ideal for fresh fruit toppings, the crust and filling can be frozen separately for up to 1 month. Defrost in the fridge overnight before assembling.
Reheating: Not required! These jars are designed to be enjoyed cold.
Recipe Variations
Get creative with these ideas:
Chocolate Lovers: Mix cocoa powder into the filling or drizzle melted dark chocolate on top.
Tropical Twist: Swap berries for diced pineapple or mango and sprinkle coconut flakes.
Nutty Delight: Add peanut butter or almond butter to the filling for a nutty kick.
Vegan Option: Substitute Greek yogurt with coconut yogurt and use vegan cream cheese alternatives.
Conclusion
There you have it—a high-protein, easy meal prep dessert that’s as satisfying to make as it is to eat. With its creamy filling, crunchy crust, and endless customization possibilities, these No-Bake Greek Yogurt Cheesecake Jars are sure to become a staple in your kitchen. So go ahead—gather your ingredients, make a batch, and enjoy without the guilt. And be sure to share your creations with friends and family if you can resist keeping them all to yourself!
FAQs
Q: Can I substitute flavored Greek yogurt for plain?
A: Definitely! Just reduce or omit the honey since flavored yogurt already contains added sugar.
Q: What’s the protein content per serving in grams?
A: Approximately 8–10 grams, depending on the type of Greek yogurt and cream cheese used.
Q: Are these jars suitable for kids?
A: Yes! They’re kid-approved thanks to their sweet yet healthy appeal. Skip the nuts if allergies are a concern.
Q: Can I prep the crust and filling ahead of time?
A: Definitely! Store each component in its own airtight container in the fridge for up to 3 days.
Q: What size jar should I use?
A: Small mason jars (about 8 oz) work perfectly for single servings.
Now that you know everything there is to know about No-Bake Greek Yogurt Cheesecake Jars, it’s time to roll up your sleeves and get cooking. Savor every bite and be sure to tag us in your photos! Happy Cheesecake Jar creating! 🍓✨

